Tuesday, November 24, 2009

Trouble shooting 503 Access Forbidden error for Drupal

Forbidden You don't have permission to access /drupal/index.php on this server. Server at localhost Port 80

The above is a common error encountered on most Apache installations. You can confirm that you do have read/write permissions to the file by using the below command to check file permissions in a directory(Linux)
#ls -l /path/to/directory containing file

You can change permissions by giving the apache group ownership and read write permissions as shown below:

Adding Apache Group Ownership
#chgrp apache /path/to/directory containing file

changing Group permissions
#chmod g+rw /path/to/directory containing file

If the permissions are in order, then it is time to check the Apache Error Logs

Most of the times, the error is output by the apache server when you try to start it. This can also be checked by checking the httpd error log.
/var/log/httpd/error_log


From the error log, you can tell which module is causing the error. You can temporarily disable the module by editing it out from the Apache config file.

/etc/httpd/conf/httpd.conf

Comment out the the module by adding a '#' before the 'LoadModule ....' line so it becomes

LoadModule log_config_module modules/mod_log_config.so
#LoadModule offendingmodule
LoadModule mime_magic_module modules/mod_mime_magic.so

Restart Apache and see if it works
#apachectl restart

Webmin


Load webmin by typing http://localhost.localdomain:10000/ into your browser
log in with your root username and password.
Then Proceed to system->System Logs->Httpd error log


This helps identify the error.
To Edit out modules causing errors, proceed to Server->Apache Server->Global Configuration->Edit Config Files-> and Edit Directive File in /etc/httpd/conf/httpd.conf.d


comment out the offending module with a "#" as described above, then save and try to start Apache.

Sunday, November 22, 2009

Installing Django on Fedora Linux Apache

NB: This is a deprecated method of running django on apache. A better method can be found at http://docs.djangoproject.com

This tutorial assumes that you have webmin  installed and running. It also assumes that you know how to use su and the webmin . Check previous posts for how to install and configure webmin.

STEPS
  1. Install Apache,Django, mod-python and postgreSQL
  2. yum install apache, mod-python, django, postgresql, postgresql-server

    You can install the above via yumex too.


  3. Start Apache, PostgreSQL via the Webmin module

  4. Make the Directory where your project will be hosted
  5. mkdir /home/projects

  6. Set it as a Django path
  7. cd /home/projects
    /usr/bin/django-admin startproject mysite


  8. Edit the python.conf file
  9. su
    *backup
    cp /etc/httpd/conf.d/python.conf /etc/httpd/conf.d/python.conf.bak

    *edit
    gedit /etc/httpd/conf.d/python.conf

    *Add the following lines
    <location "/mysite/">
    SetHandler python-program
    PythonHandler django.core.handlers.modpython
    SetEnv DJANGO_SETTINGS_MODULE mysite.settings
    PythonDebug On
    PythonPath "['/home/projects'] + sys.path"
    </location>

    *Make sure that you have this line in your configuration and its is not commented out (#)
    LoadModule python_module modules/mod_python.so


  10. Make sure that your site is in the apache aliases . You can add this by going to webmin->servers->Apache Webserver->Default Server->Aliases and Redirects
    Add mysite (or whatever you want to call it) and set the path to /home/projects/mysite


  11. Restart apache
  12. su
    apachectl restart


  13. Go to your browser, type in localhost/mysite (or whatever you called it in the redirects)
Blogged with the Flock Browser

Tuesday, November 10, 2009

Fedora Linux: Apache, MySQL, PostgreSQL ,Webmin Installation and Configuration

Installing other servers and services in Fedora can be a headache, especially without the right tools. There is all the documentation you have to read and all the commands you have to put in via the terminal. all this can be made easier with a few tools.
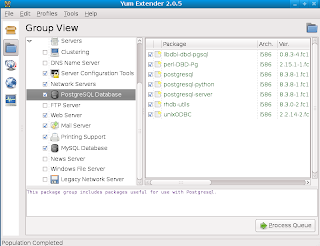

If you are intending to use Apache2, MySQL and PostgreSQL, you can install them with the appropriate yum commands. Better yet, you can install yumex (To install, type the command yum install yumex as root in the terminal) which is a GUI for yum and gives a simple and fast interface to search, configure, install and update packages.


When installing MySQL and PostgreSQL, make sure that mysql, mysql-server , postgresql, postgresql-server are installed. Several people tend to forget installing mysql-server and get errors when trying to run mysql.
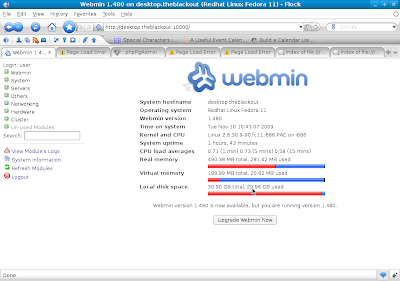

Installing Apache2, MySQL and PostgreSQL is the easy part, configuring them  can be quite hectic. To make configuring them easier, I recommend that you download and install webmin (http://www.webmin.com).

To log in to webmin, use your computer's root username and  password. Webmin is accessed via your browser by accessing your localhost via port 10000, "http://localhost:10000".

Apache
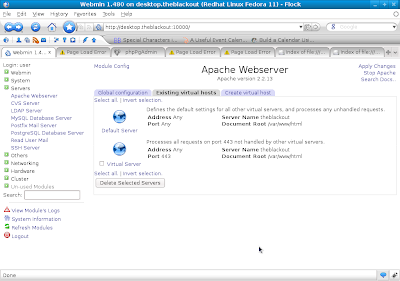
To configure Apache  on webmin, go to the "servers" section on the left tab and select "Apache Webserver".
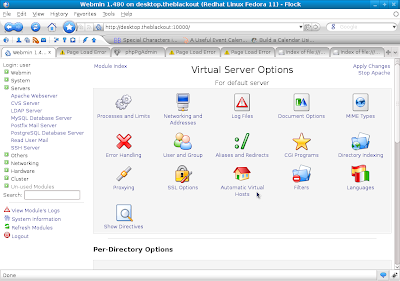
This gives you an interface for your hosts, inclusive of your virtual servers. From the interface, you can start and stop the apache server on your system. Clicking on a host gives you an interface to configure aliases, hosts, SSL options amongst other configurations.


MySQL
Once you have installed MySQL, you can initialize it and create users via the MySQL module in Webmin. The MySQL module is accessible by clicking on "servers" on the left tab and selecting "MySQL Database Server" Option. From this module, you can start  and stop the MySQL server, create, delete and manage users, create, manage and delete tables. When creating your first MySQL user, you should be careful enough to select all the permissions(under the tab labelled 'Permissions for new users')  (By default it only selects the "select table" permission). Failure to do this will result in you having a user that cannot do anything including create tables. To remedy this, you will have to reset the privileges table( I will post on the procedure later).
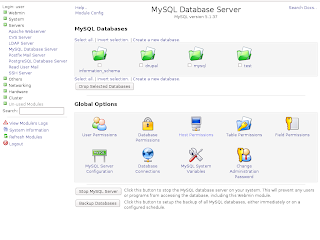


As for creating and managing tables, I prefer phpmyadmin, which is a browser(web)based interface for the MySQL server. To install it, use the command "yum install phpmyadmin". To access it, go to your browser and use the adress "http://localhost/phpmyadmin". Log in with the usernames and password that you created in webmin above.

PostgreSQL
PostgreSQL doesn't have a lot to configure, but it can take hours or even days to figure your way around the configuration. Similar to MySQL, webmin has a module for configuring PostgreSQL. The module is under servers on the left tab again.  With this module, you can initialize PostgreSQL (If you are running it for the first time), create and manage users, tables and access permissions.

To access PostgreSQL from other applications, you will need to change the host permission configurations. Under the PostgreSQL module, select that "Allowed Hosts" icon. From the interface that comes up, change the Authentication mode for the local connection to use "MD5 encrypted password".  you can then create a user (other than the default postgres user) from the module.
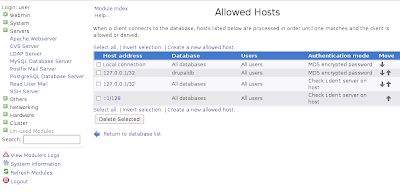

To manage PostgreSQL, you can install the phpPgAdmin application ( "yum install phpPgAdmin"). To access phpPgAdmin, type in the dress "http://localhost/phpPgAdmin" in your browser (Note the capitalization, phpPgAdmin and phppgadmin are different on Linux). Log in with the username and password you created in the PostgreSQL webmin module.

Have fun with your Fedora Linux Apache MySQL PostgreSQL PHP (Fedora LAMPP) server .

To configure Drupal in fedora, go here.
Blogged with the Flock Browser

Friday, July 24, 2009

Configuring your network with Fedora Linux DNS/Squid Transparent Proxy

This is a guide for setting up your network using fedora Linux as a DNS/Proxy server. This guide assumes that you have a router/switch that acts as a DHCP router.
Requirements
A server with 2 Ethernet cards

We then configure the 2 Ethernet cards such that one card will be located within your LAN while the other is configured with your internet gateway. In my set up, Eth 0 is on my LAN while Eth 1 connects directly to the internet. you can use the Network configuration Tool (Gnome)
System->Administration->Network
Eth 0 will use the router as its DNS and Gateway
Eth 1 will use the internet routers DNS and Gateway

Make sure that Bind DNS server and Squid are installed. you can install this by running the command
$ yum install bind squid

We then configure the Squid Proxy as follows(root privileges -su):
//# service servicename status
The above command checks the status of a service.
The squid configuration file can be dited by the following command using the gedit editor
# gedit /etc/squid/squid.conf

Backup the squid configuration file by using the following command. Maintain this file as your failsafe in case yoou mess up your configurations
# cp /etc/squid/squid.conf /etc/squid/squid.conf.bak

the above file is restored with the following command
# cp /etc/squid/squid.conf.bak /etc/squid/squid.conf

Confirm for right IP addresses in the following section of the squid configuration files

#Recommended minimum configuration:
acl all src 0.0.0.0/0.0.0.0
acl manager proto cache_object
acl localhost src 127.0.0.1/255.255.255.255
acl lan src 192.168.32.0/19 10.0.0.0/16
acl to_localhost dst 127.0.0.0/8
acl SSL_ports port 443
acl Safe_ports port 80 # http
acl Safe_ports port 21 # ftp
acl Safe_ports port 443 # https
acl Safe_ports port 70 # gopher
acl Safe_ports port 210 # wais
acl Safe_ports port 1025-65535 # unregistered ports
acl Safe_ports port 280 # http-mgmt
acl Safe_ports port 488 # gss-http
acl Safe_ports port 591 # filemaker
acl Safe_ports port 777 # multiling http
acl CONNECT method CONNECT
The bolded section above are the address of your internet routers network and those of your switch LAN(just in case they are different, though it can have one source.
To start squid service:
# service squid start
or to restart the squid service:
# service squid restart

Thats all for Squid.
Now for the BIND DNS resolver

Start the BIND service if its not running
$service bind start
# gedit /etc/named.conf
in gedit, copy the above file to a new file. Do not edit the file you opened. All changes should be made on the new file. After making your changes, save the file as /etc/named.conf
//
// named.caching-nameserver.conf
//
// Provided by Red Hat caching-nameserver package to configure the
// ISC BIND named(8) DNS server as a caching only nameserver
// (as a localhost DNS resolver only).
//
// See /usr/share/doc/bind*/sample/ for example named configuration files.
//
// DO NOT EDIT THIS FILE - use system-config-bind or an editor
// to create named.conf - edits to this file will be lost on
// caching-nameserver package upgrade.
//

options {
listen-on port 53 { 127.0.0.1; 10.0.0.1; 192.168.32.2; 192.168.32.250;};
listen-on-v6 port 53 { ::1; };
directory "/var/named";
dump-file "/var/named/data/cache_dump.db";
statistics-file "/var/named/data/named_stats.txt";
memstatistics-file "/var/named/data/named_mem_stats.txt";
allow-query { localhost; 192.168.32.0/19; 10.0.0.0/16; 192.168.32.250;};
recursion yes;
};

logging {
channel default_debug {
file "data/named.run";
severity dynamic;
};
};

view "lan" {
match-clients { localhost; 10.0.0.0/16; 192.168.32.0/19;}; // our network
recursion yes;
zone "domain" {
type master;
file "master.local.domain";
};

zone "." IN {
type hint;
file "named.ca";
};

include "/etc/named.rfc1912.zones";
};
changes should be made in the bolded areas.
restart the bind service
# service named restart


Thats all for the BIND server.

Now to the most important area, the iptables.
List the nat table; the rest are mangle-used for bridging- and the default filter which you can easily configure via the GUI.
# iptables -t nat -L
Chain PREROUTING (policy ACCEPT)
target prot opt source destination

Chain POSTROUTING (policy ACCEPT)
target prot opt source destination

Chain OUTPUT (policy ACCEPT)
target prot opt source destination

redirect all incoming traffic to the squid proxy
# iptables -t nat -A PREROUTING -i eth0 -p tcp --dport 80 -j REDIRECT --to-port 3128

All outgoing traffic to the internet
# iptables -t nat -A POSTROUTING -o eth1 -j SNAT --to 192.168.32.2

# iptables -t nat -L
Chain PREROUTING (policy ACCEPT)
target prot opt source destination
REDIRECT tcp -- anywhere anywhere tcp dpt:http redir ports 3128

Chain POSTROUTING (policy ACCEPT)
target prot opt source destination
SNAT all -- anywhere anywhere to:192.168.32.2

Chain OUTPUT (policy ACCEPT)
target prot opt source destination


Additional Info about invalid rules

To edit(delete) invalid rules in your iptables


invalid rule on iptable filter FORWARD Chain
# iptables -t filter -L FORWARD
Chain FORWARD (policy ACCEPT)
target prot opt source destination
REJECT all -- anywhere anywhere reject-with icmp-host-prohibited

list the rule on a specific chain(FORWARD)
# iptables -t filter -L FORWARD
Chain FORWARD (policy ACCEPT)
target prot opt source destination
REJECT all -- anywhere anywhere reject-with icmp-host-prohibited

delete the rule; usage table-chain-rule_number(filter-FORWARD-1)
# iptables -t filter -D FORWARD 1

check the iptable settings for the nat table as shown in previous documentation above.
Restart the iptables service
#service iptables restart


For easier configuration of all the above, use the webmin tool

Monitoring your LAN traffic


This tools enable you to monitor traffic and give you logs. IPtraf offers live monitoring while ntop enalbles you to monitor various things like:

  • sites visited
  • network load
  • network flow


to install them
IPtraf
# yum install iptraf
to run
$iptraf

Ntop
To Install
#yum install ntop
To configure
#ntop
+ to exit
To start service
#service ntop start
To use
http://localhost:3000
(username admin password; password you configured

Enjoy your networking.

Thursday, July 9, 2009

show mplayer in console in linux when opened from gui

Operating mplayer in the linux console may be easy for beginners, but what about if you want to operate it from the GUI, such that double clicking a track plays it.

First of all, you need to have installed xterm for the below command to work.

Go to any media file that you would like to play, select, then on the "open with" tab, enter the following command:

xterm -e mplayer


That should now play your files in a command line terminal, which will be displayed, rather than hidden when use the mplayer command only.

Works in Gnome, KDE.

alternatively, you can download the Real Player for Linux, from their website. This is really easy to use and install.

Digg Like CSS paginate script, Fixing white font for navigation keys.


class Paginator{
var $items_per_page;
var $items_total;
var $current_page;
var $num_pages;
var $mid_range;
var $low;
var $high;
var $limit;
var $return;
var $default_ipp = 25;
var $querystring;

function Paginator()
{
$this->current_page = 1;
$this->mid_range = 7;
$this->items_per_page = (!empty($_GET['ipp'])) ? $_GET['ipp']:$this->default_ipp;
}

function paginate()
{
if($_GET['ipp'] == 'All')
{
$this->num_pages = ceil($this->items_total/$this->default_ipp);
$this->items_per_page = $this->default_ipp;
}
else
{
if(!is_numeric($this->items_per_page) OR $this->items_per_page <= 0) $this->items_per_page = $this->default_ipp;
$this->num_pages = ceil($this->items_total/$this->items_per_page);
}
$this->current_page = (int) $_GET['page']; // must be numeric > 0
if($this->current_page <>current_page)) $this->current_page = 1;
if($this->current_page > $this->num_pages) $this->current_page = $this->num_pages;
$prev_page = $this->current_page-1;
$next_page = $this->current_page+1;

if($_GET)
{
$args = explode("&",$_SERVER['QUERY_STRING']);
foreach($args as $arg)
{
$keyval = explode("=",$arg);
if($keyval[0] != "page" And $keyval[0] != "ipp") $this->querystring .= "&" . $arg;
}
}

if($_POST)
{
foreach($_POST as $key=>$val)
{
if($key != "page" And $key != "ipp") $this->querystring .= "&$key=$val";
}
}

if($this->num_pages > 10)
{
$this->return = ($this->current_page != 1 And $this->items_total >= 10) ? "items_per_page$this->querystring\">« Previous ":"« Previous ";

$this->start_range = $this->current_page - floor($this->mid_range/2);
$this->end_range = $this->current_page + floor($this->mid_range/2);

if($this->start_range <= 0)
{
$this->end_range += abs($this->start_range)+1;
$this->start_range = 1;
}
if($this->end_range > $this->num_pages)
{
$this->start_range -= $this->end_range-$this->num_pages;
$this->end_range = $this->num_pages;
}
$this->range = range($this->start_range,$this->end_range);

for($i=1;$i<=$this->num_pages;$i++)
{
if($this->range[0] > 2 And $i == $this->range[0]) $this->return .= " ... ";
// loop through all pages. if first, last, or in range, display
if($i==1 Or $i==$this->num_pages Or in_array($i,$this->range))
{
$this->return .= ($i == $this->current_page And $_GET['page'] != 'All') ? "num_pages\" class=\"current\" href=\"#\">$i ":"num_pages\" href=\"$_SERVER[PHP_SELF]?page=$i&ipp=$this->items_per_page$this->querystring\">$i ";
}
if($this->range[$this->mid_range-1] < $this->num_pages-1 And $i == $this->range[$this->mid_range-1]) $this->return .= " ... ";
}
$this->return .= (($this->current_page != $this->num_pages And $this->items_total >= 10) And ($_GET['page'] != 'All')) ? "items_per_page$this->querystring\">Next »\n":"» Next\n";
$this->return .= ($_GET['page'] == 'All') ? "All \n":"querystring\">All \n";
}
else
{
for($i=1;$i<=$this->num_pages;$i++)
{
$this->return .= ($i == $this->current_page) ? "$i ":"items_per_page$this->querystring\">$i ";
}
$this->return .= "querystring\">All \n";
}
$this->low = ($this->current_page-1) * $this->items_per_page;
$this->high = ($_GET['ipp'] == 'All') ? $this->items_total:($this->current_page * $this->items_per_page)-1;
$this->limit = ($_GET['ipp'] == 'All') ? "":" LIMIT $this->low,$this->items_per_page";
}

function display_items_per_page()
{
$items = '';
$ipp_array = array(10,25,50,100,'All');
foreach($ipp_array as $ipp_opt) $items .= ($ipp_opt == $this->items_per_page) ? "\n":"\n";
return "Items per page:\n";
}

function display_jump_menu()
{
for($i=1;$i<=$this->num_pages;$i++)
{
$option .= ($i==$this->current_page) ? "\n":"\n";
}
return "Page:\n";
}

function display_pages()
{
return $this->return;
}
}
CSS


If you are using the above PHP paginate script from this site, you may have problems with the page buttons having white text, which becomes invisible. The clolor of the text in the buttons, is almost impossible to cahnge. the fix is to change the color of the button background in the css by adding the below line

a.paginate {
border: 1px solid #000080;
padding: 2px 6px 2px 6px;
text-decoration: none;
background-color: #yourcolor;
color: #000080;
}

Tuesday, May 12, 2009

Improving your Internert Safety: Internet Accounts

Over the last few weeks, a lot of people and organizations have been having a hectic time online.

Take the example of my friend, who was walking along the streets of Nairobi. He met a friend who was surprised to see him in the country, reason been that his friend had received an email from my friend. The email claimed that my friend was stuck in Nigeria, and had been robbed of everything. In the email to all of his friends, my friend had given an account to which cash assistance could be wired to.


My friend then rushed to a cybercafe, where he tried to log in to his yahoo account, but the password had been changed, together with the security questions required for requesting a forgotten password. 


Case number 2 involves Rihanna and Cassie, where the world has been invited to sample their albums. This weren’t the multiplatinum musical albums associated with the former, but a collection of nude photographs of the 2, whose demand rivaled that of pornography stars.


Case number 3 involves the Kenya police and Google Kenya, Uganda and morocco. They all had their websites compromised by hackers.


It is now evident that no one is safe on the web, from security institutions, web authorities to you.

Case number 3 is beyond most of us, while case 2 is beyond to some extent. As for my friend whose e mail account was compromised, it was probably due to the trust he has in Yahoo, his email provider.


What I mean, is that his account was probably hacked by a hacker who tricked him into giving out his password, thinking that he was giving it to yahoo.


To achieve this, most hackers collect e mail addresses from forums and websites where people display their email addresses to their friends, or perhaps a forum. Such websites do not secure such email addresses, e.g. by making them pictures or by using captchas (those things that tell you to enter the words in the image below) Such unprotected email addresses are then collected by computers that scan websites for such email addresses (this computers are called botnets)


After a hacker collects your email address, they then send you an email purporting to be from yahoo (or Facebook or the targeted account). This email contains a link to another site, telling you that you need to click the link to change your password or to see something. Following the link takes you to a site which looks similar to your yahoo (or Gmail or Facebook etc) log in page. Here you then give your username and password, thinking that yahoo (I am tired of repeating the rest, so yahoo shall now stand in their place) asked for it.


The hacker now has your yahoo details. So he or she (hackers adopted affirmative action long time ago) now logs in to your yahoo account, and may change your password and security questions. Of course they now send your friends mail telling them how you stuck in Nigeria.


Another way they use is by use of viruses and worms, which record everything typed into an infected machine, and the website requested before you typed it in. To avoid this, use an updated reputable antivirus. Avoid pirated antivirus software, hackers have been know to re program them to ignore certain viruses, as once happened with a certain cracked Kaspersky antivirus. Also make sure that your operating system is patched by downloading the latest hot fixes for Microsoft

Windows esp. (Google this or contact your local geek for further explanation) You may as well switch to the less targeted Linux operating system, or ensure that the cybercafe comp you are using is running on Linux (given that few update their anti virus software).


As for your email address, always make sure you type in the address yourself, don’t use links. If you use a link which asks for your password, it should not be in a message, but on the websites functions.


It is also useful to double check the address on the address bar. For yahoo, make sure it is www.yahoo.com/whatever else or www.mail.yahoo.com (.co.uk etc)/whatever else. Please note that www.yahoo.hackers.com and www.hackers.yahoo.com are completely different sites. www.yahoo.hackers.com is a page contained in www.hackers.com hence not part of www.yahoo.com. The www.hackers.yahoo.com site is under www.yahoo.com. What matters is the name before the .com, .co.uk, .org etc and not the one after www. or anywhere else in the address.


Hope that this jumbled up bits of information will help you keep safer on the net, and keep those exciting pictures of you safer a bit.

Blogged with the Flock Browser

Tuesday, February 24, 2009

Download issue #1 February 2009


You can download the current February free issue of tekniaonline at http://bit.ly/tekniaonline1. To read, you need a pdf reader which can be downloaded here

Introduction

Tekniaonline is a Kenyan electronic magazine that covers issues in the Information Communication & Technology Industry, both in Kenya and worldwide. Articles are written both by our knowledgeable writers and readers. anyone can send in article to be published, subject to approval by the baord of editors.

Tekniaonline is produced monthly, in electronic portable document format(pdf) and is available to all for free. you can also distribute it to your friends for free. To view our contacts, please download our publications.