Showing posts with label fedora. Show all posts

Sunday, December 28, 2014

Chrome Remote Desktop on Fedora Linux

Chrome Remote Desktop is a very easy way to manage your laptop from another laptop, or even from a smartphone. I have managed my laptop from my Android smartphone.

I also think it's the easiest way for most people to set up Remote desktop, despite it not being straightforward for non-Ubuntu/Debian Linux versions.

For Ubuntu, the guide is here https://support.google.com/chrome/answer/1649523?hl=en. 

For Fedora, follow the below steps:

  1. Get and install the Chrome Remote Desktop app (assuming you have Chrome/Chromium browser)
  2. You can now access other computers, but to access your computer, you need a native app, as shown in the next steps.
  3. Download the Ubuntu native app depending on your Linux version, 32 bit or 64 bit 
  4. Convert the .deb package to a Fedora .rpm package. Instructions here 
  5. Try installing and run into the error detailed here, with a solution given here too. Note, although the same error seems to be gotten from the Google Earth package, the Chrome Remote Desktop app has a similar problem and solution.
    1. If you are looking for ways of editing your files as described above, you can use vi, with the tutorial here describing that
    2. Using "vi path/to/file" should enable you edit and save a file. If a permissions issue arises, use "su vi /path/to/file" to have root permissions
  6. The converted .rpm package should now install and you should be able to use Chrome Remote Desktop from your Fedora installation
It has taken  me a while to write this guide and I may have forgotten or overlooked some items. For any issues or observations, please do not hesistate to hit the comments below. 

Thanks. 

Sunday, November 22, 2009

Installing Django on Fedora Linux Apache

NB: This is a deprecated method of running django on apache. A better method can be found at http://docs.djangoproject.com

This tutorial assumes that you have webmin  installed and running. It also assumes that you know how to use su and the webmin . Check previous posts for how to install and configure webmin.

STEPS
  1. Install Apache,Django, mod-python and postgreSQL
  2. yum install apache, mod-python, django, postgresql, postgresql-server

    You can install the above via yumex too.


  3. Start Apache, PostgreSQL via the Webmin module

  4. Make the Directory where your project will be hosted
  5. mkdir /home/projects

  6. Set it as a Django path
  7. cd /home/projects
    /usr/bin/django-admin startproject mysite


  8. Edit the python.conf file
  9. su
    *backup
    cp /etc/httpd/conf.d/python.conf /etc/httpd/conf.d/python.conf.bak

    *edit
    gedit /etc/httpd/conf.d/python.conf

    *Add the following lines
    <location "/mysite/">
    SetHandler python-program
    PythonHandler django.core.handlers.modpython
    SetEnv DJANGO_SETTINGS_MODULE mysite.settings
    PythonDebug On
    PythonPath "['/home/projects'] + sys.path"
    </location>

    *Make sure that you have this line in your configuration and its is not commented out (#)
    LoadModule python_module modules/mod_python.so


  10. Make sure that your site is in the apache aliases . You can add this by going to webmin->servers->Apache Webserver->Default Server->Aliases and Redirects
    Add mysite (or whatever you want to call it) and set the path to /home/projects/mysite


  11. Restart apache
  12. su
    apachectl restart


  13. Go to your browser, type in localhost/mysite (or whatever you called it in the redirects)
Blogged with the Flock Browser

Tuesday, November 10, 2009

Fedora Linux: Apache, MySQL, PostgreSQL ,Webmin Installation and Configuration

Installing other servers and services in Fedora can be a headache, especially without the right tools. There is all the documentation you have to read and all the commands you have to put in via the terminal. all this can be made easier with a few tools.


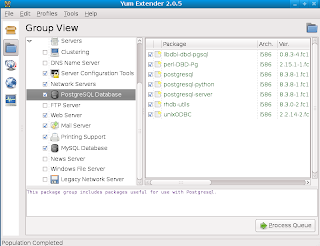
If you are intending to use Apache2, MySQL and PostgreSQL, you can install them with the appropriate yum commands. Better yet, you can install yumex (To install, type the command yum install yumex as root in the terminal) which is a GUI for yum and gives a simple and fast interface to search, configure, install and update packages.


When installing MySQL and PostgreSQL, make sure that mysql, mysql-server , postgresql, postgresql-server are installed. Several people tend to forget installing mysql-server and get errors when trying to run mysql.


Installing Apache2, MySQL and PostgreSQL is the easy part, configuring them  can be quite hectic. To make configuring them easier, I recommend that you 
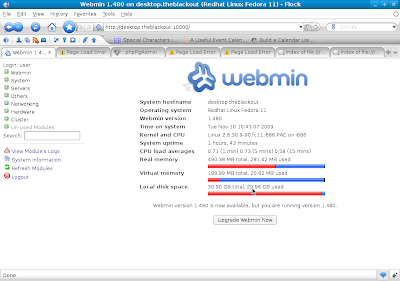
download and install webmin (http://www.webmin.com).

To log in to webmin, use your computer's root username and  password. Webmin is accessed via your browser by accessing your localhost via port 10000, "http://localhost:10000".

Apache
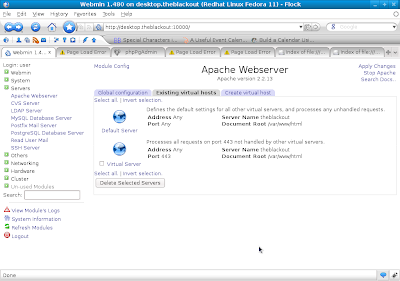
To configure Apache  on webmin, go to the "servers" section on the left tab and select "Apache Webserver".
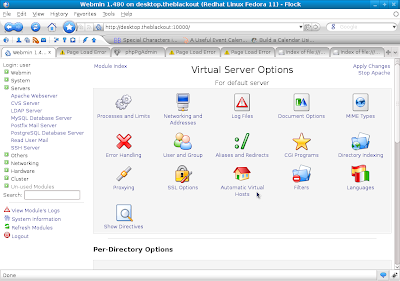
This gives you an interface for your hosts, inclusive of your virtual servers. From the interface, you can start and stop the apache server on your system. Clicking on a host gives you an interface to configure aliases, hosts, SSL options amongst other configurations.
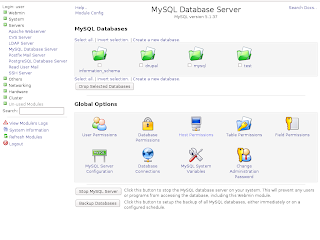


MySQL
Once you have installed MySQL, you can initialize it and create users via the MySQL module in Webmin. The MySQL module is accessible by clicking on "servers" on the left tab and selecting "MySQL Database Server" Option. From this module, you can start  and stop the MySQL server, create, delete and manage users, create, manage and delete tables. When creating your first MySQL user, you should be careful enough to select all the permissions(under the tab labelled 'Permissions for new users')  (By default it only selects the "select table" permission). Failure to do this will result in you having a user that cannot do anything including create tables. To remedy this, you will have to reset the privileges table( I will post on the procedure later).


As for creating and managing tables, I prefer phpmyadmin, which is a browser(web)based interface for the MySQL server. To install it, use the command "yum install phpmyadmin". To access it, go to your browser and use the adress "http://localhost/phpmyadmin". Log in with the usernames and password that you created in webmin above.

PostgreSQL
PostgreSQL doesn't have a lot to configure, but it can take hours or even days to figure your way around the configuration. Similar to MySQL, webmin has a module for configuring PostgreSQL. The module is under servers on the left tab again.  With this module, you can initialize PostgreSQL (If you are running it for the first time), create and manage users, tables and access permissions.

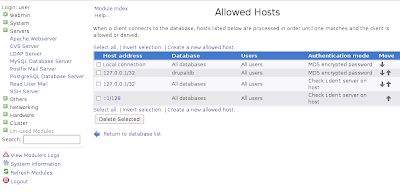
To access PostgreSQL from other applications, you will need to change the host permission configurations. Under the PostgreSQL module, select that "Allowed Hosts" icon. From the interface that comes up, change the Authentication mode for the local connection to use "MD5 encrypted password".  you can then create a user (other than the default postgres user) from the module.


To manage PostgreSQL, you can install the phpPgAdmin application ( "yum install phpPgAdmin"). To access phpPgAdmin, type in the dress "http://localhost/phpPgAdmin" in your browser (Note the capitalization, phpPgAdmin and phppgadmin are different on Linux). Log in with the username and password you created in the PostgreSQL webmin module.

Have fun with your Fedora Linux Apache MySQL PostgreSQL PHP (Fedora LAMPP) server .

To configure Drupal in fedora, go here.
Blogged with the Flock Browser

Friday, July 24, 2009

Configuring your network with Fedora Linux DNS/Squid Transparent Proxy

This is a guide for setting up your network using fedora Linux as a DNS/Proxy server. This guide assumes that you have a router/switch that acts as a DHCP router.
Requirements
A server with 2 Ethernet cards

We then configure the 2 Ethernet cards such that one card will be located within your LAN while the other is configured with your internet gateway. In my set up, Eth 0 is on my LAN while Eth 1 connects directly to the internet. you can use the Network configuration Tool (Gnome)
System->Administration->Network
Eth 0 will use the router as its DNS and Gateway
Eth 1 will use the internet routers DNS and Gateway

Make sure that Bind DNS server and Squid are installed. you can install this by running the command
$ yum install bind squid

We then configure the Squid Proxy as follows(root privileges -su):
//# service servicename status
The above command checks the status of a service.
The squid configuration file can be dited by the following command using the gedit editor
# gedit /etc/squid/squid.conf

Backup the squid configuration file by using the following command. Maintain this file as your failsafe in case yoou mess up your configurations
# cp /etc/squid/squid.conf /etc/squid/squid.conf.bak

the above file is restored with the following command
# cp /etc/squid/squid.conf.bak /etc/squid/squid.conf

Confirm for right IP addresses in the following section of the squid configuration files

#Recommended minimum configuration:
acl all src 0.0.0.0/0.0.0.0
acl manager proto cache_object
acl localhost src 127.0.0.1/255.255.255.255
acl lan src 192.168.32.0/19 10.0.0.0/16
acl to_localhost dst 127.0.0.0/8
acl SSL_ports port 443
acl Safe_ports port 80 # http
acl Safe_ports port 21 # ftp
acl Safe_ports port 443 # https
acl Safe_ports port 70 # gopher
acl Safe_ports port 210 # wais
acl Safe_ports port 1025-65535 # unregistered ports
acl Safe_ports port 280 # http-mgmt
acl Safe_ports port 488 # gss-http
acl Safe_ports port 591 # filemaker
acl Safe_ports port 777 # multiling http
acl CONNECT method CONNECT
The bolded section above are the address of your internet routers network and those of your switch LAN(just in case they are different, though it can have one source.
To start squid service:
# service squid start
or to restart the squid service:
# service squid restart

Thats all for Squid.
Now for the BIND DNS resolver

Start the BIND service if its not running
$service bind start
# gedit /etc/named.conf
in gedit, copy the above file to a new file. Do not edit the file you opened. All changes should be made on the new file. After making your changes, save the file as /etc/named.conf
//
// named.caching-nameserver.conf
//
// Provided by Red Hat caching-nameserver package to configure the
// ISC BIND named(8) DNS server as a caching only nameserver
// (as a localhost DNS resolver only).
//
// See /usr/share/doc/bind*/sample/ for example named configuration files.
//
// DO NOT EDIT THIS FILE - use system-config-bind or an editor
// to create named.conf - edits to this file will be lost on
// caching-nameserver package upgrade.
//

options {
listen-on port 53 { 127.0.0.1; 10.0.0.1; 192.168.32.2; 192.168.32.250;};
listen-on-v6 port 53 { ::1; };
directory "/var/named";
dump-file "/var/named/data/cache_dump.db";
statistics-file "/var/named/data/named_stats.txt";
memstatistics-file "/var/named/data/named_mem_stats.txt";
allow-query { localhost; 192.168.32.0/19; 10.0.0.0/16; 192.168.32.250;};
recursion yes;
};

logging {
channel default_debug {
file "data/named.run";
severity dynamic;
};
};

view "lan" {
match-clients { localhost; 10.0.0.0/16; 192.168.32.0/19;}; // our network
recursion yes;
zone "domain" {
type master;
file "master.local.domain";
};

zone "." IN {
type hint;
file "named.ca";
};

include "/etc/named.rfc1912.zones";
};
changes should be made in the bolded areas.
restart the bind service
# service named restart


Thats all for the BIND server.

Now to the most important area, the iptables.
List the nat table; the rest are mangle-used for bridging- and the default filter which you can easily configure via the GUI.
# iptables -t nat -L
Chain PREROUTING (policy ACCEPT)
target prot opt source destination

Chain POSTROUTING (policy ACCEPT)
target prot opt source destination

Chain OUTPUT (policy ACCEPT)
target prot opt source destination

redirect all incoming traffic to the squid proxy
# iptables -t nat -A PREROUTING -i eth0 -p tcp --dport 80 -j REDIRECT --to-port 3128

All outgoing traffic to the internet
# iptables -t nat -A POSTROUTING -o eth1 -j SNAT --to 192.168.32.2

# iptables -t nat -L
Chain PREROUTING (policy ACCEPT)
target prot opt source destination
REDIRECT tcp -- anywhere anywhere tcp dpt:http redir ports 3128

Chain POSTROUTING (policy ACCEPT)
target prot opt source destination
SNAT all -- anywhere anywhere to:192.168.32.2

Chain OUTPUT (policy ACCEPT)
target prot opt source destination


Additional Info about invalid rules

To edit(delete) invalid rules in your iptables


invalid rule on iptable filter FORWARD Chain
# iptables -t filter -L FORWARD
Chain FORWARD (policy ACCEPT)
target prot opt source destination
REJECT all -- anywhere anywhere reject-with icmp-host-prohibited

list the rule on a specific chain(FORWARD)
# iptables -t filter -L FORWARD
Chain FORWARD (policy ACCEPT)
target prot opt source destination
REJECT all -- anywhere anywhere reject-with icmp-host-prohibited

delete the rule; usage table-chain-rule_number(filter-FORWARD-1)
# iptables -t filter -D FORWARD 1

check the iptable settings for the nat table as shown in previous documentation above.
Restart the iptables service
#service iptables restart


For easier configuration of all the above, use the webmin tool

Monitoring your LAN traffic


This tools enable you to monitor traffic and give you logs. IPtraf offers live monitoring while ntop enalbles you to monitor various things like:

  • sites visited
  • network load
  • network flow


to install them
IPtraf
# yum install iptraf
to run
$iptraf

Ntop
To Install
#yum install ntop
To configure
#ntop
+ to exit
To start service
#service ntop start
To use
http://localhost:3000
(username admin password; password you configured

Enjoy your networking.